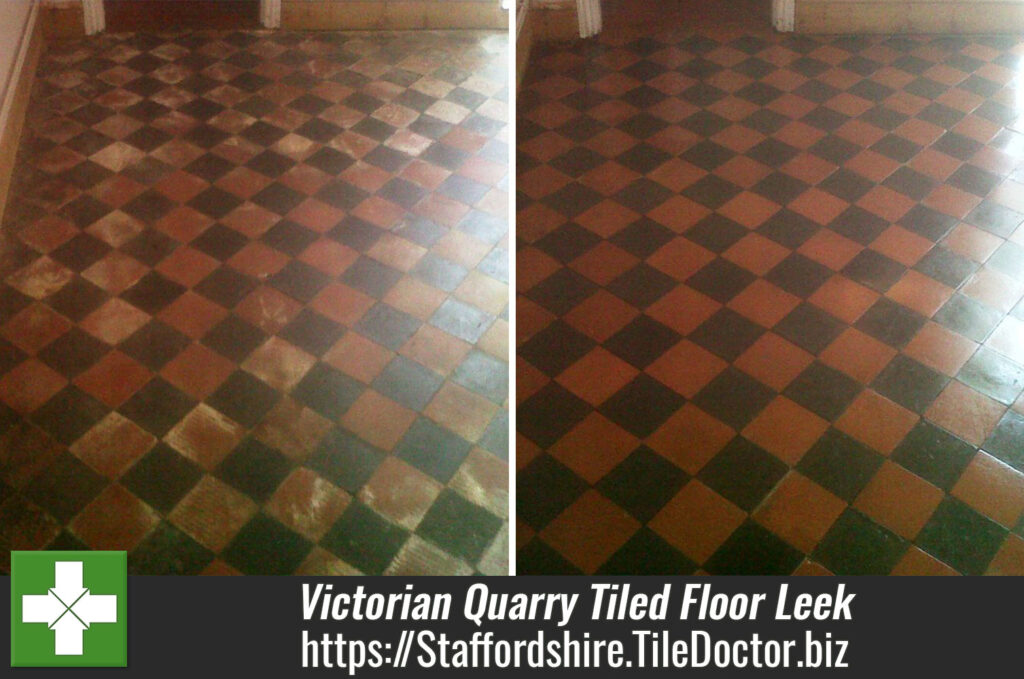
Classic Chequered Encaustic Tiled Victorian Hallway Floor Refurbished in Leek
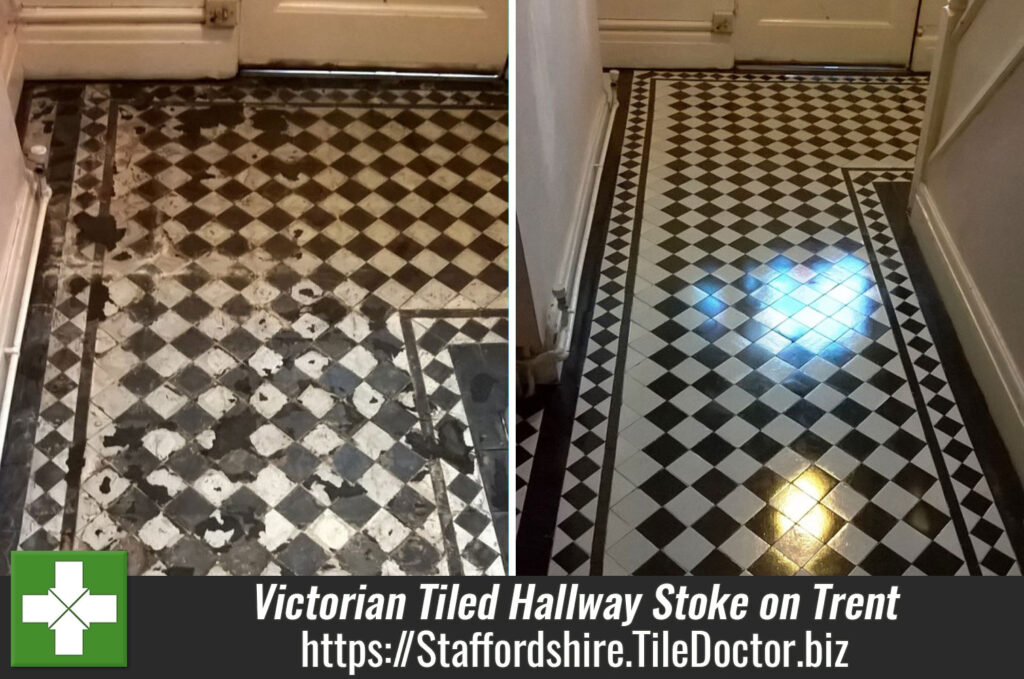
At this Victorian property in Leek I was asked to renovate the encaustic tiles in the hallway which were laid in a classic Black and White chequer pattern. They had previously been covered in carpet for many years and the owner now wanted the floor brough back to life as a period feature in keeping with the age of the property.
 |
 |
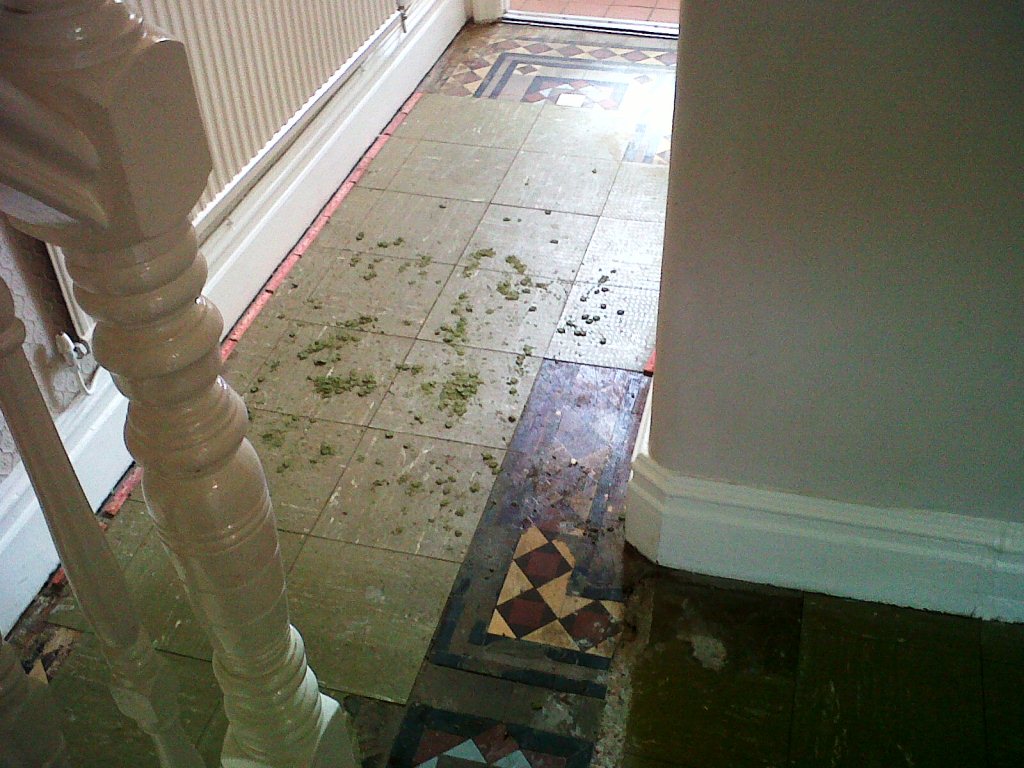
The carpet had been glued down and you could see a lot of discolouration around the edges where the glue was still present on the tile. Also, I could see there were several sections of loose tiling that needed to be secured.
I worked out a restoration plan and quote which the owner was happy with and a date set of my return to do the work which would take three days.
Renovating Black and White Victorian Floor Tiles
The first day was spent repairing the loose tiles in the two doorways and a section next to the stairs. The tiles had become debonded with the floor, so the base needed to be cleaned out and the tiles fixed back into place with fresh adhesive. The next step would require the use of machinery so I waited until the next day to start that in order to give the tiles time to set firmly overnight.
 |
 |
On then second day cleaning started by wetting the floor with a strong dilution of Tile Doctor Pro-Clean. A strong dilution was needed to help breakdown the soiling and adhesive. This was left to soak in for fifteen minutes before starting the process of scrubbing the floor.
The bulk of the scrubbing was done using a rotary machine fitted with a coarse 50-grit diamond pad which was needed to remove the patination that the carpet had pressed into the tile surface. These circular pads can struggle to get into the edges and corners so this was followed where needed with a handheld 60-grit diamond block until I was satisfied. The soiling was rinsed off with water and extracted with a wet vacuum.

Next step was to give the floor an acid wash using Tile Doctor Grout Clean-up. This is simply mopped onto the floor and brushed in before being rinsed off as before with the wet vacuum. The Pro-Clean used earlier is alkaline so the acidic nature of Grout Clean-up neutralises the floor, it also further cleans up the tiles and will dissolve any salts that may be present in the tile and could result in the appearance of efflorescence later. This is a common problem with old floors like this one which don’t have the benefit of a damp proof membrane.
Last job of the day was to dry the floor as much as possible with the wet vacuum and add grouting using a matching grout where needed.
Sealing a Black and White Encaustic Tiled Victorian Floor
I then left the floor for four days to dry out. It’s not a good idea to apply sealer to a damp tile as you can get a patchy result so I wanted to be sure it was dry before sealing. On my return I checked the floor was dry and then started the sealer application with four coats of Seal and Go which is a water-based sealer that doesn’t give off a smell as it dried. I chose this product as the client wanted the tiles to have a deep shine and this product certainly achieves that.
 |
 |
I think you will agree the floor looked amazing once complete, the tiled looked lighter, brighter and overall made the whole hallway look very inviting. It definitely added the period wow factor.
 |
 |
Before leaving I took time to discuss maintenance cleaning and recommended they use Tile Doctor’s Neutral Tile Cleaner. This product is a gentle but effective tile cleaner that won’t impact the sealer.
Professional Encaustic Floor Tile Restoration in Staffordshire
Classic Chequered Encaustic Tiled Victorian Hallway Floor Refurbished in Leek Read More »