Author name: Trevor Preece

Covering Staffordshire, Trevor Preece is your local specialist for tile cleaning, stone cleaning, grout cleaning and tile, stone and grout sealing covering the restoration of all types of stone and tiled flooring including Ceramic, Limestone, Marble, Porcelain, Quarry, Sandstone, Slate, Terracotta, Terrazzo, Travertine and Victorian tile.

Slate Wet Room Tile Renovation Stafford

White Staining Removed from Slate Wet Room in Stafford

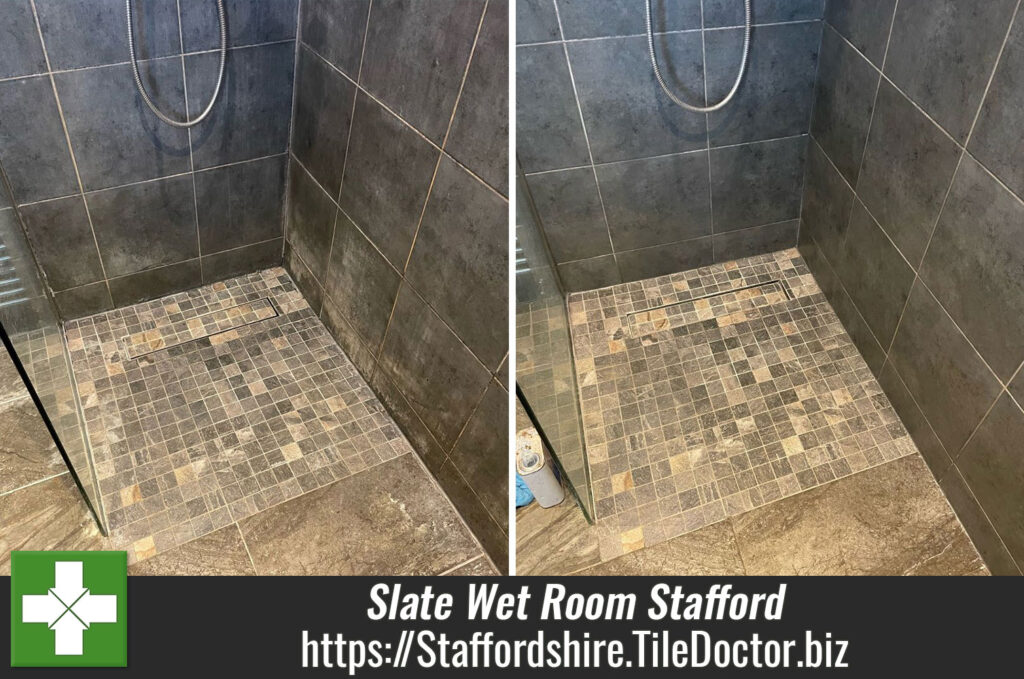
This client from Stafford needed some help with the Slate tiles in their bathroom wet room which as you can see from the photos had suffered with lot of white staining. The staining was either Limescale or efflorescent salts which are salts deposits on the tile which appear as the stone became wet and then dries out.

Slate Wet Room Tiles Before Cleaning Stafford

The staining had built up over time and was all over the wet floor and wall areas. I quoted for cleaning the tiles, removing all the staining in the process, and then sealing to prevent this happening in the future. Happy with my plan and quote I got the go ahead and we agreed a date for the work to start.

Slate Wet Room Tiles Before Cleaning Stafford

Cleaning a Slate Tiled Bathroom Wet Room

The first job was to clean the wall and floor tile and grout with a strong dilution of Tile Doctor Pro-Clean. This was decanted into a spray bottle and sprayed onto the Slate tile and Grout where it was left to soak in for five to ten minutes before being scrubbed in using a stiff brush and small black scrubbing pads.

The soiling was then vacuumed away with a wet and dry vacuum. For stubborn staining Tile Doctor also sell a product called Oxy-Gel which is a gel-based version of Pro-Clean that really sticks well to wall tiles allowing for longer dwell times.

The next step was to tackle the White staining so I repeated the cleaning process with Tile Doctor Acid Gel. Like Oxy-Gel this is a gel-based product that sticks well to wall tiles. This product however is acid based and so can dissolve the salt staining allowing it to be removed with the wet vacuum as before.

Last step was to inspect the bathroom for any further staining and repeat the relevant process until I was satisfied. I then rinsed all the tiles with cold water to remove any trace of product and then left the bathroom to dry out overnight.

Sealing a Slate Tiled Bathroom Wet Room

The next day I applied Tile Doctor X-Tra Seal to the Slate which is an oil-based sealing product that is rated for internal and external use. This sealer restores oil into the stone improving its general appearance and improving the colour in the stone.

X-Tra Seal is a breathable impregnating sealer that works by soaking into the pores of the stone preventing dirt from residing there and thereby leaving it on the surface where it can be rinsed away. It creates a strong water repellency over the tile so will ensure water simply drains off and doesn’t collect. If you apply the second coat as we did, it gives the tiles a nice sheen, allowing the colour of the tiles to shine through.

Slate Wet Room Tiles After Cleaning Stafford

The lighting in the wet room wasn’t great so I don’t think the photos on this page have done the job any justice however it was certainly a massive improvement, my customer certainly thought so and left the flowing glowing feedback:

Great communication start to finish. Attention to detail and pride in workmanship. Really happy with the result. Our slate wet room tiles look like new!

Slate Wet Room Tiles After Cleaning Stafford

For after care cleaning I recommended the regular use of Tile Doctor Aqua-Pro, which is pH neutral and is designed for the daily cleaning of sealed bathroom tiles. This will keep the wet room looking as good as it is now.


Professional Renovation of a Slate Tiled Wet Room in Staffordshire

White Staining Removed from Slate Wet Room in Stafford Read More »

Marble Floor Polishing Crakemarsh Hall Uttoxeter

Polishing a Grand Marble Hallway at Crakemarsh Hall Uttoxeter

The pictures below are of a Marble tiled floor installed in the hallway of a property at Crakemarsh Hall, near Uttoxeter. The Marble had lost its shine due to several years of wear and was now looking quite flat and uninteresting. This happens with highly polished floors which need to be re-polished every six to 12 months if you want to keep them looking fabulous.

Marble Floor Before Polishing Crakemarsh Hall Uttoxeter

Naturally my client had become unhappy with the dull appearance of the stone and I was asked to call round and put the shine back. I viewed the floor and talked them through the polishing process. I left them with a quote which they were happy to accept.

Marble Floor Before Polishing Crakemarsh Hall Uttoxeter Marble Floor Before Polishing Crakemarsh Hall Uttoxeter

Cleaning a Marble Tiled Hallway Floor and Grout

The first job was to clean the floor using a rotary floor machine fitted with a Black pad to scrub in Tile Doctor Pro-Clean which is an effective alkaline tile and grout cleaner. I used a medium dilution of Pro-Clean sprayed onto the tiles and left to soak in for ten minutes before scrubbing.

These pads can struggle to get right into the grout so I used a hand-held scrubbing brush along the grout lines to tackle any stubborn grout stains and dirt hiding in the recesses. The soiling was then rinsed off the floor with water and extracted with a wet vacuum.

Polishing a Marble Tiled Hallway Floor

Work then commenced on polishing the Marble for which I used several grades of diamond burnishing pads starting with a coarse 400-grit. Only water is needed to help lubricate the process and once the pad has been run over each tile at least three times the soiling is rinsed off and extracted with the wet vacuum as before. This process is then repeated with the 800 and 1500-grit pad until you reach the 3000-grit pad which is applied with only a little water sprayed onto the tiles.

Sealing Marble Floor Tiles

To add a deep durable polish to the Marble I then applied Tile Doctor Polishing Powder which is spread over the floor ground into the marble using a White polishing pad. I also went around the edges with a handheld buffing machine fitted with smaller 6″ pads.

Marble Floor After Polishing Crakemarsh Hall Uttoxeter Marble Floor After Polishing Crakemarsh Hall Uttoxeter

I finished the floor by using a super high speed burnishing machine fitted with a White polishing pad to remove any marks left on the floor. My client was so happy that they have booked in for an annual Maintenance clean for next year to keep the floor in top condition.

Marble Floor After Polishing Crakemarsh Hall Uttoxeter

Before leaving I also encouraged then to clean the floor using Tile Doctor Stone Soap which is a mild but effective cleaning solution that helps maintain the patina on polished stone. Many of the floor cleaning products you find in supermarkets are simply too strong for use on a sealed floor.


Professional Restoration of a Victorian Tiled Hallway in Worcestershire

Polishing a Grand Marble Hallway at Crakemarsh Hall Uttoxeter Read More »

Victorian Hallway Floor Restoration Shenstone Lichfield

Detailed Classic Victorian Tiled Hallway Floor Restored in Shenstone

The pictures below are of a very detailed Victorian tiled hallway at a period property in Shenstone near Lichfield. As you can see the floor was in a really bad state, fortunately the owner wanted it restored as it was part of the history of the house.

Victorian Hallway Floor Before Restoration Shenstone Lichfield Victorian Hallway Floor Before Restoration Shenstone Lichfield

It’s certainly an impressive floor, the pattern was very detailed and very intricate so well worth preserving as it must have taken a craftsman some time to create. Additionally, there was a section of floor under a door threshold that had been filled with concrete. The owner was unhappy with how that looked and wanted it removing and replacing with tiles to match the hallway.

I suspect there may have been some movement in the door threshold at some point in the floors long history so instead of repairing the tiles it was simply removed and back filled with concrete.

Repairing and Deep Cleaning Victorian Floor Tiles

Work started with the repair of this section by carefully digging out the cement screed and removing the rubble. A quick setting self-levelling compound was then poured in to provide a flat base on which I could tile.

You will see from the after photos below that I had managed to source some tiles that matched the colour of the original floor and so once the compound had set these were fixed into place with a rapid setting adhesive. The tiling wasn’t as intricate as the main floor but I thought it blended well.

Once the replacement tiles had set, I moved onto to deep cleaning starting with an application of Tile Doctor Pro-Clean. I used a strong dilution for maximum effect spraying it onto the floor and leaving it to soak in for ten minutes before scrubbing it in with a weighed rotary floor buffer fitted with a 100-grit pad. The soil generated was then rinsed off the tiles and extracted with a wet vacuum.

I followed this up with an acid wash which involves applying an acidic cleaning product called Grout Clean-up and then scrubbing it in using the 100-grit pad and weighted floor buffer as before. This is a beneficial treatment for tiled floors as not only does it remove further contaminates and grout smears from the tiles it also deals with Efflorescence issues which can be a real problem with old floors that have no damp proof membrane. Again, the floor was rinsed with water and the soils removed with a wet vacuum.

Sealing Victorian Floor Tiles

I then left the floor to dry off overnight and came back the next day to seal the tiles, however having checked the moisture level of the floor with a damp meter I realised it was still too damp and applying a sealer now would only result in a patchy final appearance.

This work was done in December 2022 which being a wet and cold month didn’t help, in fact I had to leave the floor for a week until it was completely dry and able to take a sealer. Once dry though I applied four coats of Tile Doctor Seal & Go which gave it a nice shine.

Victorian Hallway Floor After Restoration Shenstone Lichfield

As you can see from the photos on this page the old Victorian tiles responded extremely well to the treatment and needless to say my customer was very happy with the outcome. For aftercare cleaning I recommended the use of Tile Doctor Neutral Clean which is a gentle yet effective tile cleaning product that’s ideal for use on sealed floors.

Victorian Hallway Floor After Restoration Shenstone Lichfield Victorian Hallway Floor After Restoration Shenstone Lichfield


Professional Victorian Tile Restoration service in Staffordshire

Detailed Classic Victorian Tiled Hallway Floor Restored in Shenstone Read More »

Black Yellow Victorian Tiled Hallway Floor Restoration Barton-under-Needwood

Victorian Tiled Hallway Extended and Renovated in Barton-under-Needwood

This customer from Barton-under-Needwood had a classic Black and Yellow tiled Victorian floor needed extending to the bottom of the stairs. The original floor also needed a deep clean and seal which would help the new and old tiles blend once done.

Black Yellow Victorian Tiled Hallway Floor Before Cleaning Barton-under-Needwood

We don’t tend to do tiling jobs at Tile Doctor unless as in this case it’s part of bigger renovation or restoration work. I was certainly happy to help and after paying the customer a visit to fully understand the requirements I provided a quote and a date was set for the work to begin.

Black Yellow Victorian Tiled Hallway Floor Before Cleaning Barton-under-Needwood

Extending a Victorian Tiled Hallway Floor

The first job was to dig out the concrete out and a metal surround where a sunken mat had originally been at the bottom of the staircase. After doing I applied self-levelling cement to level the floor off ready to lay the tiles the next day.

I had managed to source replacement tiles that were a very close match to the original but due to the different in the modern metric and the original imperial sizes work was needed to cut them to size. Because of this the next 2 days were spent carefully cutting and laying the tiles in a matching pattern followed by grouting the whole floor.

Deep Cleaning a Victorian Tiled Hallway Floor

On the following day with the extended floor now set I moved onto to cleaning and renovating the original floor. It had the usual issues relating to a worn out sealer allowing dirt to become ingrained in the pores of the tile.

To resolve the problems, I washed the floor with a dilution of Tile Doctor Pro-Clean scrubbed in with a coarse 100-grit pad. These pads are encrusted with industrial diamonds and really cut through the dirt and clean up the tiles. The released dirt was then rinsed off the floor with water and a wet vacuum.

This was followed by an acid wash using Tile Doctor Grout Clean-up which is designed to remove old grout smears and salts from the tile. Salts can be a real problem on old Victorian floors with no damp proof membrane as there is nothing to stop salts being caried up through the tile from the subfloor and being left as white deposits as the moisture evaporates, a process commonly known as Effloresence.

After another rinse and extract with the wet vacuum the floor was left to dry off overnight.

Sealing a Victorian Tiled Hallway Floor

I went back the next day to seal the whole floor but having taken several moisture readings with a damp meter I decided to leave it a week to dry as parts of the floor were not dry enough for a seal.

Black Yellow Victorian Tiled Hallway Floor After Restoration Barton-under-Needwood

I then went back the following week to seal the floor with four coats of Tile Doctor Seal and Go which leaves a nice satin finish. The customer was delighted with the finish. For aftercare I recommended Tile Doctor Neutral Cleaner which is a gentle but effective product that is safe to use on sealed tiles.

Black Yellow Victorian Tiled Hallway Floor After Restoration Barton-under-Needwood Black Yellow Victorian Tiled Hallway Floor After Restoration Barton-under-Needwood


Victorian Tiled Hallway Professionally Extended and Renovated in Staffordshire

Victorian Tiled Hallway Extended and Renovated in Barton-under-Needwood Read More »

Quarry Tiled Floor Renovation Barlaston

Red Quarry Tiled Floor Deep Cleaned and Sealed in Barlaston

The Red Quarry tiled floor shown below are from the hallway of a house in the village of Barlaston that dates to the early 1900’s. Hallways get a lot of use and over the years the tiles had seen a lot of wear and were now looking patchy with various levels of staining and dirty grout.

Quarry Tiled Floor Barlaston Before Cleaning

After surveying the floor and running a few tests I was able to give the homeowner a quote for the work which would take two days, the first to clean and the second to apply a sealer that would protect the tiles from staining going forward. Happy with the quote we scheduled a date for the work to commence.

Deep Cleaning a Quarry Tiled Hallway in Barlaston

To clean up the tiles I applied a strong dilution of Tile Doctor Pro-Clean which is our go to tile and grout cleaning product. Its best to leave it on the tile and grout for ten minutes or sometimes longer to give it time to break down the dirt and coatings. The floor was then scrubbed with a rotary machine fitted with a poly brush attachment and a stiff grout brush along the grout lines.

The combination of the cleaning agent and mechanical scrubbing releases the dirt from the tile to the surface where its removed with a wet vacuum. Once the floor was clear the tiles were then inspected and the process repeated where needed.

Last step of the cleaning process was to treat the tiles to an acid wash with grout clean-up. I highly recommend this for old floors like this one which were installed before the invention of the damp proof membrane. The problem is without a DPM moisture can rise through the tiles and deposit salts on the surface of the tile as it evaporates, a process known as efflorescence. If you look closely at the photos above you can spot white staining as a result. As well as countering the alkaline salts the acid will also remove old grout smears and neutralise the use of the alkaline Pro-Clean used earlier.

After a final rinse and vacuum the Quarry tiles were left to dry off overnight.

Sealing a Quarry Tiled Hallway Floor in Barlaston

Applying sealer to a damp floor can result in a patchy appearance so on my return I first tested the floor with a damp meter to ensure it was dry. All was well so I able to move onto applying the sealer and for this floor I chose to use Tile Doctor Seal and Go.

Seal and Go works very well on Quarry Tiles improving their appearance and adding an appealing satin finish. The tiles really soaked up the sealer and I had to apply four coats before I was satisfied it was fully sealed.

Quarry Tiled Floor Barlaston After Cleaning

Once done the tiles were transformed and my client was very pleased with their new hallway floor. Before leaving I took time to discuss aftercare cleaning for which I recommend Tile Doctor Neutral Cleaner which is a gentle but effective product that won’t harm the sealer.


Professional Restoration of an Old Quarry Tiled Floor in Staffordshire

Red Quarry Tiled Floor Deep Cleaned and Sealed in Barlaston Read More »

Quarry Tiled Dining Room Restored Stafford

Restorative Cleaning and Sealing of a Quarry Tiled Floor in Stafford

It had been some years since this Quarry tiled floor at a house in the market town of Stafford had been professionally cleaned and was now long overdue some TLC. The previous sealer had worn down allowing dirt to accumulate in the pores of the tile leaving it looking dull and dirty and difficult to keep clean. There were also a couple of loose tiles that needed re-setting.

Quarry Tile Floor Before Cleaning Stafford

Before quoting I visited the property to inspect the floor and carry out a test clean on part of the floor. The test came out well which impressed my clients and gave me an accurate plan for cleaning the rest of the Quarry tiled floor. I quoted for two days work plus materials which was agreed, and we scheduled a date for the work to be done.

Quarry Tile Floor Before Cleaning Stafford

Cleaning and Repairing a Quarry Tiled Dining Room Floor

The first day I spent deep cleaning the Quarry tile and grout using a strong dilution of Tile Doctor Pro-Clean worked in with a rotary machine with black scrubbing pad attached. The soil generated was extracted with a wet vacuum and the floor rinsed and extracted again.

At this point I like to inspect the floor looking for any stubborn marks or areas that need repeat cleaning. Once identified I repeat the earlier cleaning process and if that doesn’t work, I resort to using neat Pro-Clean scrubbed in by hand with a lot of elbow grease until I’m satisfied that the tile and grout is as clean as possible.

As mentioned before there were a couple of loose tiles that needed refitting and so before leaving, I spent time pulling those out, cleaning them up, preparing the base, relaying them with fresh adhesive and then grouting with matching grout. The floor was then left overnight to fully dry out and for the newly replaced tiles to set.

Sealing a Quarry Tiled Dining Room Floor

I returned the following day and first used a damp meter to check that the floor was suitably dry. I know from experience that for best results the floor needs to be dry before applying the sealer, to apply a sealer to a damp floor can result in a patchy appearance. In this case the readings were fine otherwise I would of arranged to come back on a different day or applied a bit of gentle heat from a heat gun until dry.

I had discussed finishes with my client before starting work and it was clear their preference was for the Quarry tiles to have a nice shine, as it would have had originally so I selected to use Tile Doctor Seal and Go. This product is a specially formulated water-based blend of acrylic polymers that provides a stain resistant seal and being water based it doesn’t give off an unpleasant odour as it dries. Four coats of Seal and Go were applied allowing each coat to dry out before applying the next one. The result was the tiles were left with a lovely subtle shine as requested.

Quarry Tile Floor After Cleaning Sealing Stafford

The client was very happy with the newly restored floor and for aftercare cleaning I recommended Tile Doctor Neutral Tile cleaner, this is pH balanced product that that isn’t overly strong and won’t prematurely degrade the newly applied sealer like most of the household cleaners you find in supermarkets.

Quarry Tile Floor After Cleaning Sealing Stafford


Professional Restoration of a Quarry Tiled Hallway in Staffordshire

Restorative Cleaning and Sealing of a Quarry Tiled Floor in Stafford Read More »

COVID-19 Symptoms

Working Through COVID-19

Due to the impact of the Covid-19 Coronavirus it’s become necessary to change our working practices in-line with government guidelines and to take action to minimise health risks to you and our team.  At present, none of our team are showing any symptoms of the virus so we are continuing home visits for quotes and to complete scheduled works should it be safe to do so.

All Tile Doctors are aware to look out for the known symptoms of High Temperature and New Continuous Cough. We are aware of the need to self-isolate should it be necessary and should this be the case we will contact you to postpone. We also ask you monitor your own health and contact us should it be necessary for you to postpone for the same reason. Should you be in a high-risk group we recommend contacting us to re-arrange a visit to later in the year.

Naturally the situation could change very quickly and therefore we will no longer ask for any official notice should you wish to postpone or cancel a booking, however we would appreciate a phone call.

Our Tile Doctors are aware of the guidelines and will carry out a risk assessment at every premises they visit. They also understand the importance of observing the following whilst on site:

  • Avoiding Physical Contact
  • The importance of Social Distancing
  • Wearing single use Gloves and Overshoes
  • Regular hand washing and use of liquid sanitiser
  • Cleaning Equipment with Detergent after use

We are monitoring Government guidance and will ensure we continually adjust our working practices as required and endeavour to keep you informed. These are challenging times that are impossible to predict, the key is to stay safe and accepting of late changes should they occur.

Regards

Trevor Preece
Staffordshire Tile Doctor
#TileDoctorUK #weareinthistogether #pulltogether #staystrong

For more information about Covid-19 virus we recommend the following sources:
https://www.nhs.uk/conditions/coronavirus-covid-19/
https://www.gov.uk/government/collections/coronavirus-covid-19-list-of-guidance
https://www.gov.uk/government/publications/covid-19-track-coronavirus-cases

Working Through COVID-19 Read More »

Victorian Tiled Floor Before After Refurb Stoke-on-Trent

Chequered Victorian Tiled Hallway Floor Refurbished in Stoke-on-Trent

This is a great example of a Victorian Tiled floor refurbishment which I recently completed at a property in Stoke-on-Trent. If you look closely at the photographs below you will see the white tiles are looking grubby and paint splash staining from decorating. The owner was unhappy with how the floor now looked and wanted it refurbished.

Victorian Floor Before Cleaning Sealing Stoke-on-Trent Victorian Floor Before Cleaning Sealing Stoke-on-Trent

Black and White Victorian tiles laid in a chequered diamond pattern is a classic style and a very popular choice for hallways at the turn of the 20th century. Over the years many have been replaced or covered up with carpet and those that survived are now a sought-after period feature that adds value to your property.

Renovating Black and White Victorian Floor Tiles

I initially cleaned the floor by applying a strong dilution of Tile Doctor Pro-Clean which was sprayed onto the floor and then left to soak in for ten minutes. Pro-Clean is our goto tile and grout cleaning product that is designed to break down dirt and remove old sealers. After ten minutes the solution was scrubbed in with a rotary machine fitted with a coarse 200-grit pad. The soil generated was rinsed off the tiles and extracted with a wet vacuum and the floor inspected.

I would see more work was needed to get the floor clean and free of staining, so I spot treated the problem areas with Tile Doctor Remove and Go which is a coatings remover. I worked in small sections leaving the product to dwell as before for 10 minutes, I then used a wallpaper steamer with handheld diamond blocks to get the ingrained dirt out of the floor. After a final rinse and extraction, the floor looked clean so, so much better than when I started.

Apply a Sealer to Black and White Victorian Floor Tiles

I then left the floor to dry off overnight and came back the second day to seal the tiles first checking the moisture levels with a damp meter. Applying sealer to a damp floor will result in the floor looking patchy when it dries so I always check first. The readings were good, so I started to apply the first of five coats of sealer which for this floor I chose Tile Doctor Seal and Go Extra.

Old Victorian floors do not have a damp-proof membrane installed under the floor so its important to select a sealer that will allow moisture to rise through the tiles and evaporate on the surface, Seal and Go Extra allows for this. Choosing a non-breathable sealer can result in moisture being trapped under the floor where it can reach out to the walls leading to rising damp.

Victorian Floor After Cleaning Sealing Stoke-on-Trent Victorian Floor After Cleaning Sealing Stoke-on-Trent

Once the floor dried it looked fantastic. In fact, my customer was so happy with the transformation she was taking pictures and sending them to her daughters as I worked; she couldn’t believe how well it was turning out.


Professional Victorian Tiled Hallway Renovation in Staffordshire

Chequered Victorian Tiled Hallway Floor Refurbished in Stoke-on-Trent Read More »

Slate Tiled Kitchen Floor Cleaned Sealed in Sutton Coldfield

Renovating a Beautiful Slate Tiled Kitchen Floor in Sutton Coldfield

I recently completed the renovation of a Multi-Coloured Slate tiled kitchen floor in Sutton Coldfield. I was actually at the property before Christmas to survey the floor and quote for the work however the owners had planned to have a new kitchen installed in the new year, so we decided it was best for me to wait until after the installation to complete the work.

The slate was in good condition but like any stone floor you do need to maintain the sealer to prevent dirt becoming ingrained in the stone. Sealer do wear off overtime especially in the high foot traffic areas such as Kitchens and within a few years the tiles become dull and difficult to clean effectively.

Multi-Coloured Slate Tiled Kitchen Floor Before Cleaning and Sealing Sutton Coldfield Multi-Coloured Slate Tiled Kitchen Floor Before Cleaning and Sealing Sutton Coldfield

The kitchen was installed on schedule and I got the call to arrange a visit to deep clean and reseal the floor which would take to two days, one to clean and one to seal.

Cleaning Dirty Slate Kitchen Tiles

To begin the restoration, I soaked the slate in a strong dilution of Tile Doctor Pro-Clean and left it to soak in for about ten minutes re-applying extra solution where it dried. Pro-Clean is a powerful tile cleaner that will strip old sealers when applied in concentrated form. I agitated the product using a black pad fitted to a rotary buffing machine. I paid particular attention to the grout which the customer had trouble keeping clean. The rotary pad struggles to reach into the recesses of the grout lines so I also made sure to scrub the solution into the grout with a grout brush.

Once I was satisfied that the Slate and the Grout was clean and clear of old sealers, I gave the whole floor a thorough rinse with water using a wet vacuum to extract the soil and get the floor as dry as possible. The floor was then left to dry off fully overnight.

Sealing Slate Kitchen Tiles

Returning to the property the next day, I ran some quick damp tests to check for any excess moisture that might have prevented me from sealing the floor. We will always do this as excess moisture can affect the sealer curing.
The customer was very happy with the clean and the floor was dry, so we discussed sealer options to find out their preference for Matt or Satin finish. With the decision made to go with a Satin finish I began the application of the Tile Doctor Seal and Go which enhances the look of the stone with an aesthetically pleasing low-sheen finish, as well as providing on-going protection against ingrained dirt and staining.

Multi-Coloured Slate Tiled Kitchen Floor After Cleaning and Sealing Sutton Coldfield Multi-Coloured Slate Tiled Kitchen Floor After Cleaning and Sealing Sutton Coldfield

A total of four coats of Seal and Go were needed to seal the Slate tiles and as you can see from the photos the sealer really put the life back into the floor.


Rejuvenating a Multicoloured Slate Tiled Kitchen Floor in Staffordshire

Renovating a Beautiful Slate Tiled Kitchen Floor in Sutton Coldfield Read More »

Old Victorian Tiled Vicarage Floor Before After Restoration Sutton Coldfield

Victorian Tiled Vicarage Floor Restored in Sutton Coldfield

This property in Sutton Coldfield dates to the early 1800s and was owned by the local church until recently. The property needed a lot of work and the new owners had asked me to restore the beautiful Victorian Tiled Flooring which I suspect was as old as the property itself. The property was in the process of a complete refurb when I first visited to survey the floor and so I recommended that they call me in to work on the floor when all the other work was complete. I find leaving the floor restoration until last is the best approach as tradesmen usually exacerbate the problem.

Old Victorian Tiled Floor Sutton Coldfield Vicarage Before Cleaning Old Victorian Tiled Floor Sutton Coldfield Vicarage Before Cleaning

Although incredibly dirty the Victorian Tiles were in good condition for their age, however there were some areas where tiles were missing or damaged and replacements would need to be sourced and fitted. Sourcing replacements is not usually a problem for Victorian Floors as there are a few companies such as the Vintage Floor Tile Company that still sell them due to their popularity. I also find you can pickup old tiles at restoration yards and eBay.

Old Victorian Tiled Floor Sutton Coldfield Vicarage Before Cleaning Old Victorian Tiled Floor Sutton Coldfield Vicarage Before Cleaning

Day 1 – Replacing Damaged Victorian Floor Tiles

On the first day I set about replacing the missing and broken tiles; I had taken photographs of the floor before hand and had plenty of time to source replacements. This process involves carefully removing the damaged tiles and scrapping out the subfloor to remove old adhesives and grout. This is followed by cutting the replacement tiles to size and fixing them in place using a flexible adhesive. If the subfloor has crumbled away, then this also needs cleaning out and building backup with cement to the right level before fixing the tiles. Needless to say, this is painstaking work and takes time to get right, in this case most of the day.

Day 2 – Deep Cleaning Victorian Floor Tiles

On the second day I set about giving the tiles a good deep clean using a strong dilution of Tile Doctor Pro-Clean which a very effective alkaline cleaning product that’s safe to use on tile, stone and grout.

The Pro-Clean was applied to the floor and then left to soak into the pores in the tile for about ten minutes before being scrubbed in using a rotary machine. The machine was fitted with a Polyscrub brush and run over the tiles at slow speed. This process worked well, and it wasn’t long before the cleaning solution had turned black with the dirt that had been released from the floor. The soiled solution was then extracted from the floor using a wet vacuum and the process repeated in areas that I felt could do with more work.

Old floors like these don’t have a damp proof membrane installed and can suffer from white alkaline salts being deposited on the surface of the tile and damp evaporates up through the tile as it dries. To counter this problem, I decided to follow up the cleaning by giving the tiles an acid wash using Tile Doctor Grout Clean-up, not only does this neutralise the salts it also removes old grout smears and other mineral deposits from tiles making them much cleaner.

Old Victorian Tiled Floor Sutton Coldfield Vicarage During Cleaning

I scrubbed the product into the tiles using a deck brush and then rinsed it off with water and extracted with the wet vacuum. Being an Acid, we don’t recommend you leave it on the floor for too long.

Day 3 – Sealing Victorian floor Tiles

The next day I confirmed the floor had dried and then proceeded to apply five coats of Tile Doctor Seal & Go Extra. This product is fully breathable and will cope well with any inherent damp issues that can cause problems in an old floor such as this, it also adds a nice shine to the tile as you can see in the photographs below.

Old Victorian Tiled Floor Sutton Coldfield Vicarage After Sealing

The final result was a huge transformation and my customer was very happy with the outcome and booked me in to seal the new flooring in the kitchen/utility and conservatory areas.

Old Victorian Tiled Floor Sutton Coldfield Vicarage After Sealing Old Victorian Tiled Floor Sutton Coldfield Vicarage After Sealing


Professional Restoration of Victorian Vicarage floor in Staffordshire

Victorian Tiled Vicarage Floor Restored in Sutton Coldfield Read More »

Travertine Kitchen Floor Tiles Before and After Cleaning Stoke on Trent

Travertine Kitchen Floor Polished in Stoke on Trent

The pictures below are from a Travertine tiled Kitchen floor I was asked to clean recently at a house in Stoke on Trent. The floor was laid about five years ago and always had a matt appearance and never had a shine at all. I went over to look at the floor and was able to use a spare tile they had to show them how shiny I could get the stone. They were really impressed with the result and could now see the potential of their floor, so they booked me in straight away.

Travertine Kitchen Floor Tiles Before Cleaning Stoke-on-Trent Travertine Kitchen Floor Tiles Before Cleaning Stoke-on-Trent

Cleaning and Polishing Travertine Tiled Floor

Restoring the shine on a polished stone such as Travertine, Limestone or Marble requires the surface to be stripped back and then buffed, which we did by using a set of burnishing pads. These diamond encrusted pads come in different grades from 400 through to 3000 grit and each one does a different job from scrubbing to polishing. I started with the course red 400 grit pad together with a little water to help lubricate and then carried on with the medium Blue 800, then fine Yellow 1500 grit pad, then very fine Green 3000 grit burnishing pads.

My last task for the day was to give the floor a good rinse to remove any remaining soil and then dried the floor as much as possible using a wet vacuum before leaving the floor to dry off overnight.

Sealing Travertine Tile

On our return the next I applied a single coat of Tile Doctor Colour Grow which is a specially designed stone sealer that brings out the deep colour of the stone. Once this had dried I worked in Tile Doctor Shine powder with a buffing pad to give a really deep and durable finish.

Before leaving I finished the floor off by spray burnishing the floor with an ultra high speed burnishing machine fitted with a white buffing pad.

Travertine Kitchen Floor Tiles After Cleaning Stoke-on-Trent Travertine Kitchen Floor Tiles After Cleaning Stoke-on-Trent

For the first time in five years the Travertine floor has a deep shine and my customer was really pleased with the outcome.

Putting a Deep Shine on Travertine Tiled Floor in Gloucestershire

Travertine Kitchen Floor Polished in Stoke on Trent Read More »

Victorian Tiled Hallway Before and After Restoration Stafford

Laminate Covered Victorian Tiled Hallway Restoration in Stafford

The photographs below are of a Victorian Tiled Hallway I recently restored in Stafford. This lovely floor was discovered underneath laminate flooring I can only assume because a previous owner of the house couldn’t work out how to restore it as it was in a terrible state and decided to cover it up.

Fortunately thanks to the power of the internet the current owner discovered Tile Doctor on-line and called us in to have a look with the aim of restoring the floor as a period feature.

Victorian Tiled Hallway Before Restoration Stafford

Restoring a Victorian Tiled Hallway

Laminate is laid as a floating floor so unlike vinyl or carpet coverings that I usually deal with the laminate had if anything protected what was essential a very dirty Victorian tiled floor that was stained with adhesive and paint splashes.

With the laminate flooring already removed by the owner my preparation consisted of adding protection to the wooden paintwork. Once done I started to tackle the dirt by applying a strong dilution of Tile Doctor Pro-Clean and leaving it to soak into the tile and grout for about fifteen minutes. Then with a rotary machine fitted with a black scrubbing pad and running at slow speed I set about scrubbing the floor to get as much ingrained dirt out of pores of the Victorian floor tiles as possible. Once that was done I rinsed off the now soiled cleaning solution with water and then extracted it with a wet vacuum.

This action made a huge difference to the tile and grout, but the paint and adhesive stains were more difficult to remove so these areas were treated with Tile Doctor Remove and Go assisted with a steamer to help draw the staining out.

With the tile ad grout now clean of dirt and stains I gave the floor a rinse with water to remove any trace of cleaning products and then extracted as much moisture from as possible using the wet vacuum. I then left for the day allowing the floor to dry off fully overnight.

Sealing Victorian floor Tiles

The next day I confirmed the floor had dried off and then proceeded to apply five coats of Tile Doctor Seal & Go Extra which is a fully breathable sealer that adds a lovely shine to the tiles. I used a fully breathable sealer as these old houses were built before the invention of the damp proof course and I wanted to ensure that any moisture could rise through the floor and evaporate unhindered.

Victorian Tiled Hallway After Restoration Stafford
The final photograph shows the huge transformation I achieved with the floor and as you can imagine my customer was very happy with the result.

Victorian tiled hallway floor Restored in Stafford

Laminate Covered Victorian Tiled Hallway Restoration in Stafford Read More »

Wood Effect Porcelain Lichfield Before and After Cleaning

Cleaning Wood Effect Porcelain Tiles after Building Works in Lichfield

This article comes from a recently renovated house in the medieval cathedral city of Lichfield which is North of the new M6 Toll road. My customer had recently brought a house there and was refurbishing it from top to bottom, unfortunately however by the time the refurb was finished the new wood effect Porcelain tiled floor in the kitchen and hallway had become very dull & dirty.

Wood Effect Porcelain Lichfield Before Cleaning Wood Effect Porcelain Lichfield Before Cleaning

Acid Washing Wood Effect Porcelain Tile

The tiled were basically dirty with plaster dust and I suspected grout smears to I decided the quickest and most effective method to clean them up would be to give the whole floor an acid wash with Tile Doctor Grout Clean-up.

Tile Doctor Grout Clean–Up is specially designed for removing excess grout as well as dealing with mineral salt problems so working in sections I applied the product to the floor and left to soak for five minutes before scrubbing into the tiles and then rinsing it off with cold water which was then removed with a wet vacuum. Some of the more stubborn areas had to be retreated and with a longer dwell time and more scrubbing but the process had the desired effect.

Once the whole floor was done I gave it a final rinse and used the wet vacuum to remove as much moisture from the floor as possible before leaving it to fully dry off overnight.

Sealing Wood Effect Porcelain Tile

There are a number of different types of Porcelain tile and most do not require a sealer however I had determined that this type was in fact the micro porous variety and would accept a sealer. If you’re having a new tiled floor laid it helps to keep some unused tiles back so you can test different sealers on them before applying the sealer to the actual floor. In this case three coats of Tile Doctor Seal and Go were applied and this worked very well as you can see from the photographs below.

Wood Effect Porcelain Lichfield After Cleaning Wood Effect Porcelain Lichfield After Cleaning

The customer said it looked better than it did when it was first laid so was very happy.

Builders Clean for Porcelain Tiled Floor in Staffordshire

Cleaning Wood Effect Porcelain Tiles after Building Works in Lichfield Read More »

Limestone Tiled Kitchen Floor in Tutbury After Stain Removal

Stains Removed from Limestone Tiled Kitchen Floor in Tutbury

First of all apologies for the quality of the photographs on this page, I clearly need to work on my photography skills. Normally photographs like these wouldn’t make the website site however they did capture the stain quite well so I thought they would be worth including. The customer who lives at a large house near Tutbury had a spillage on the lovely Limestone floor tiles in her kitchen which she tried to clean with different chemicals including bleach which just made the problem worse.

The trouble with bleach is it’s a strong acid which will eat through the sealer on your stone tiles, which in this case resulted in whitish circles you can see in the middle of the photograph below.

Limestone Tiled Kitchen Floor in Tutbury Before Stain Removal
The tiles were overdue a deep clean anyway so the owner called me in to renovate the floor and hopefully remove the staining.

Removing Staining from Limestone Tiled Floor

I started the process by giving the floor an initial clean with Tile Doctor Pro-Clean which is a strong alkaline tile cleaning product. This wouldn’t address the staining problem but my intention was to get the grout clean and also remove any surface dirt and grit from the floor. The cleaning solution was scrubbed in and then rinsed off with water which was then extracted using a wet vacuum.

The best method for restoring the appearance of Limestone floor tiles requires stripping back the surface of the tile and then building back the polish of the stone using a process we call burnishing. To do this we use a set of diamond encrusted pads which come in different grades from coarse to very fine. The pads are applied using a floor buffer machine and each pad does a different job and you start with the course red pad together with a little water and then carry on with the white, then yellow pad again using a little water removing the soiled water along the way.

Although the floor now looked great the bleach had done more damage than first anticipated and had stripped the stone of its natural oils where the spillage had been. To rectify this I applied Tile Doctor Stone Oil to the floor which I’m happy to say resolved the problem.

Sealing Limestone Tiles

Once the Stone Oil has soaked in I followed up with the application of Tile Doctor Colour Grow which is a specially designed stone sealer that penetrates into the pores of the stone protecting it from within whilst enhancing the deep natural colours in the stone. The floor was then left for about one hour to dry before working in Tile Doctor Shine powder with a white buffing pad to give a really deep robust finish.

Limestone Tiled Kitchen Floor in Tutbury After Stain Removal
The floor was transformed after I had finished and before leaving I made sure to advise the owner on the correct way to maintain her floor in future.

Polishing Limestone Floor Tiles in a Staffordshire Kitchen

Stains Removed from Limestone Tiled Kitchen Floor in Tutbury Read More »

Sandstone kitchen floor after cleaning Rugeley

Rejuvenating a Sandstone Tiled Floor at a Barn Conversion in Rugeley

The owners of this barn conversion in Rugeley had got to breaking point with their large Sandstone tiled kitchen and utility floor. They had tried various different cleaning methods without success to clean the floor, but it always appeared grimy, and they suspected it had not been sealed following installation.

Sandstone kitchen floor before cleaning Rugeley
This would make sense: a lack of sealer would have allowed the dirt to become ingrained in the stone, making it impossible to clean. Interestingly their next door neighbour had suffered the same problem and decided to replace the floor entirely. The property owners were seriously considering the same as a solution, that is until they as found Tile Doctor. I was called down to the property to see what could be done.

Sandstone kitchen floor before cleaning Rugeley

Removing Ingrained Dirt from Sandstone Tiles

To begin the cleaning process, I applied a strong, undiluted quantity of Tile Doctor Pro Clean to the floor and left it to dwell for a few minutes. This allows the high alkaline cleaner to seep into the pores of the stone to begin to break down the ingrained dirt. After the short dwelling period, I scrubbed the floor using a rotary machine with a black pad attached.

With the tiles clean, I then focused specifically on cleaning the grout lines and edges of the floor using a grout brush in combination with a steamer. Finally, I rinsed the floor with cold water, before vacuuming up the resulting cleaning slurry before leaving the tiles to dry completely overnight. The drying period is exceptionally important because excess moisture can cloud any new sealers and damage their performance.

Sealing Sandstone Tiles

I returned to the property the next day to find the clean tiles showing some signs of damp. It’s possible that the property, being a barn conversion, does not have a damp proof membrane installed beneath the floor, making these sorts of issues inevitable.

To be on the safe side, I opted to seal the Sandstone tiles with Tile Doctor Seal and Go Extra, which allows full moisture vapour transmission, making it fully breathable and ideal for these situations. It also provides durable protection against ingrained dirt and stains and does a good job enhancing the look of the tiles.

Sandstone kitchen floor after cleaning Rugeley
The customers were very happy with the result, and left the comment below on the Tile Doctor Feedback system.

WONDERFUL, delight to have Trevor restoring my very tired flagstone kitchen floor, it is now beautiful. Many thanks Trevor a job very well done.

I’m sure they were also relieved that they won’t have to go to the expense of replacing their fantastic Sandstone tiled floor. What was Once a problem is now a real asset to the property.

Sandstone kitchen floor after cleaning Rugeley
 

Dirty Sandstone Tiled Floor Restored at a Staffordshire Barn Conversion

Rejuvenating a Sandstone Tiled Floor at a Barn Conversion in Rugeley Read More »

Quarry Tiled Kitchen After Cleaning in Tutbury Burton on Trent

Quarry Tiled Kitchen Floor Deep Cleaned and Sealed in Tutbury

This Quarry tiled kitchen floor was in very good condition, with no cracked or broken tiles. However, my customer, who lives in the town of Tutbury, near Burton-on-Trent, was keen to boost the condition of the tiles further through professional maintenance, including a deep clean and a fresh seal to restore the sheen to the Quarry. NB, did you know it’s estimated that Tutbury has actually been inhabited for 3000 years, having once been the site of an Iron Age hill fort, this house of course was a lot more recent.

Quarry Tiled Kitchen Before Cleaning in Tutbury Burton on Trent Quarry Tiled Kitchen Before Cleaning in Tutbury Burton on Trent

Cleaning a Quarry Tiled Kitchen Floor

To clean the tiles, I chose to use our tried and trusted alkaline cleaner, Tile Doctor Pro Clean. We use Pro Clean on most types of natural stone floor, including Quarry, Slate, and Victorian. I applied Pro Clean liberally across the floor and left it to dwell for a short period, giving it time to seep into the tile to get underneath and lift out any ingrained dirt. The cleaner was then agitated using a scrubbing pad fitted to a rotary machine to remove the dirt and other general muck.

I then rinsed the floor with cold water and soaked up the resulting slurry with a wet-vac machine. Some areas of the floor proved to be quite stubborn to clean, so in these areas the cleaning process was repeated until satisfactory results were achieved. Finally, the floor was given another rinse and left to dry off overnight.

Sealing a Quarry Tiled Kitchen Floor

The next day I returned to the property and checked that the floor was ready to seal by running several damp tests, with the results indicating that was no excess moisture remaining on the tiles. We carry out these tests before sealing because moisture can cloud the sealer and prevent it from properly protecting the tiles.

My choice of sealer was Tile Doctor Seal & Go, a cost effective topical sealer that builds up a robust layer of protection on the surface of the floor and provides a durable sheen finish that, as you can see from the photographs, really lifts the appearance of the tiles.

Quarry Tiled Kitchen After Cleaning in Tutbury Burton on Trent Quarry Tiled Kitchen After Cleaning in Tutbury Burton on Trent

It’s a fact that any sealed tiled floor will need to be regularly maintained as sealers do wear off over time, especially in the high traffic areas, and this is when the floor starts to lose its appearance as dirt becomes trapped in the pores of the stone. The life of the sealer can be extended however by ensuring you only clean the floor with a PH Neutral cleaner.

Professional Quarry Tile Floor Maintenance Staffordshire

Quarry Tiled Kitchen Floor Deep Cleaned and Sealed in Tutbury Read More »

Kitchen Quarry Tiles Before and After Restoration Stoke on Trent

Quarry Tiled Kitchen Floor Restored in Stoke-on-Trent

Here’s a job I recently completed in the heartland of the English pottery industry, Stoke-on-Trent. In this particular instance I was commissioned by my client to restore the appearance of the Quarry tiled floor in her kitchen which as you can see from the photo below was far from looking it’s best. Quarry tiles are typically a very hard wearing stone, but in high traffic areas like a kitchen, even this type of tile will require regular maintenance.

Kitchen Quarry Tiles Before Restoration Stoke-on-Trent

Cleaning a Quarry tiled floor

My first task, before beginning the restoration, was to remove the kickboards from around the bottom of the kitchen units, to prevent them from being damaged during the process. The next step was to acid wash the tiles using Tile Doctor Grout Clean-Up which was scrubbed into the tiles to remove old grout and plaster that had become stuck to the surface of the tiles at some point in the past. Once this had done its job I rinsed the entire floor with water washing away the excess soiled residue and any trace of acid.

The next step was to give the tiles a good clean using Tile Doctor Pro Clean, which is a high alkaline cleaner suitable for use on a range of natural stone floors. This was left to dwell on the tiles for ten minutes, allowing it time to seep into the stone to get underneath – and lift out – the ingrained dirt. I then agitated the solution with a scrubbing brush to remove the muck from the surface of the tiles. The floor was then given another rinse with water, and this was extracted using a wet vacuum.

Sealing a Quarry tiled floor

I left the floor to dry after cleaning for more than 24 hours, making sure that it would be ready for sealing the next day. Upon my return to the house I checked the floor was dry and then sealed the floor using four coats of Tile Doctor Seal & Go, which provides a robust surface seal and a durable low-sheen finish. The product is suitable for use on internal, unsealed, porous surfaces.

Kitchen Quarry Tiles After Restoration Stoke-on-Trent
The photographs above bears witness to the massive improvement which has been made to the quarry tiles, which has not only completely transformed the look of the tiles but also the appearance of the kitchen.

Restoring a Quarry tiled kitchen floor in Staffordshire

Quarry Tiled Kitchen Floor Restored in Stoke-on-Trent Read More »

Slate Tiled Floor After Cleaning Burton-on-Trent

Dirty and Worn Slate Tiled Kitchen Floor Restored in Burton-on-Trent

This slate floor was installed in the kitchen of a house in the town of Burton-on-Trent in Staffordshire. As the name suggests, Burton-on-Trent sits alongside the River Trent, which runs through most of the northern Midlands. The old sealer on my client’s Slate tiled kitchen floor had completely worn off and, as a result, dirt had become ingrained in the pores of the stone which was now in need of restoration.

Slate is typically a very durable tile, having been used both residentially and commercially for hundreds of years but, in particularly high traffic areas like kitchens it’s important to maintain the sealer or dirt will get into the pores of the stone making the floor difficult to clean effectively and leading to the tile looking worse for wear. I was commissioned to get the floor back to good health and I prescribed a deep clean and re-seal.

Slate Tiled Floor Before Cleaning Burton-on-Trent Slate Tiled Floor Before Cleaning Burton-on-Trent

Cleaning a dirty Slate tiled floor

To start the cleaning process, I first diluted Tile Doctor Pro-Clean and water and left it to soak into the floor for a while so it could get to work lifting out the dirt from the pores of the stone. Pro-Clean is a versatile, high alkaline cleaner safe to use on natural stone which can be diluted in different strengths depending on the level of soil build-up. In this case, I opted for a reasonably strong solution due to the significant amount of ingrained dirt (as shown by the photographs).

After about ten minutes I started working in small sections to agitate the tiles with a scrubbing pad attached to a rotary machine. The pad and machine take a lot of the hard work out of the cleaning process although I usually do the grout by hand using a stiff scrubbing brush. Once I had finished the initial clean, I rinsed the entire floor with water, before repeating the process multiple times until I was satisfied that I had got the Slate tiles as clean as possible.

Sealing a Slate Tiled Floor

After completing the clean, I left the house for a few days to allow the floor enough time to dry before being sealed. As any Tile Doctor will tell you, all moisture must be removed from a tiled floor before sealing it, as it has the potential to compromise the effectiveness of the sealer.

Once I was satisfied that the floor was completely dry, I sealed the tiles using four coats of Tile Doctor Seal & Go, which provides a stain resistant surface seal and a nice, low sheen finish. Seal & Go is a water based product (so no smell) and is suitable for use on a wide variety of unsealed, porous surfaces as Slate, Victorian tile, Sandstone, and textured Quarry tiles.

Slate Tiled Floor After Cleaning Burton-on-Trent Slate Tiled Floor After Cleaning Burton-on-Trent

As you can see, the overall results were fantastic and my client was really happy with the difference I’d been able to achieve.

Restoring Slate Tiled Floor in Burton-on-Trent

Dirty and Worn Slate Tiled Kitchen Floor Restored in Burton-on-Trent Read More »

Grout Colouring Ceramic shower tiled cubicle in stafford Before and After

Grout Cleaning and Grout Colouring of a Dull Shower Cubicle in Stafford

The photographs below were taken at a private residence in the town of Stafford, the owner of the house was unhappy with the state of the grout lines in their ceramic tiled shower which had, over time, had become grey and stained. As you cans see from the photograph, the whole area in general was very tired looking. I recommended a grout clean, colouring and seal to get the shower back to looking its best. My client was happy with me to proceed and I promptly began the work.

Grout Colouring Ceramic shower tiled cubicle in stafford before

Grout Colouring including Prep

My first task was to clean the grout using a grout colouring pre-treater which cleans and prepares the grout joints to make a better bond with the colourant. The tiles were then given a rinse and dried before I stripped out the old sealant strip between the tiles and shower tray.

My next task was to carefully apply a white Grout Colourant along the grout lines using an applicator brush. The colourant is basically painted onto the grout and any excess is wiped off the adjacent tile before it dries. The colourant, which is available in a range of shades, is an epoxy based product that both recolours and seals the grout lines to provide protection against dirt and stains.

To finish off the job I applied fresh sealant between the shower tray and bottom row of tiles in a matching white. The whole shower took on a much fresher appearance after I finished and looked transformed.

Grout Colouring Ceramic shower tiled cubicle in stafford after
My client contacted me two weeks after I completed the job to happily inform me that my work had actually solved a leakage problem that have been affecting the shower cubicle. With the addition of a robust clean, colouring and seal, my client was very pleased with the results.

Refreshing a Ceramic Tiled Shower Cubicle in Staffordshire

Grout Cleaning and Grout Colouring of a Dull Shower Cubicle in Stafford Read More »

Slate Tiles in Burton on Trent Before and After Cleaning

Slate tiled kitchen floor refreshed in Burton on Trent

Pictures below of a slate tiled kitchen floor that I recently maintained at a house in Burton on Trent. The problem was the usual one that the sealer had worn down and the floor had lost its polished look leaving it dull and the owner of the house wanted it looking new again.

Cleaning black slate floor tiles

The floor was cleaned using a dilution of Tile Doctor Pro-Clean which was left to soak into the slate for ten minutes before being worked into the tile using a rotary machine fitted with a scrubbing pad. The process was repeated where there were stubborn stains and then the whole floor was washed down to remove the soiled cleaning solution and any trace of product. The floor was then dried as much as possible using a wet vacuum and left to fully dry overnight.

Slate Tiles in Burton on Trent Before Cleaning Slate Tiles in Burton on Trent Before Cleaning

Sealing Slate floor tiles

I left the floor overnight to dry then came back next day and used a damp test meter to verify the floor was dry and ready for sealing. Once happy I proceed to apply four coats of Tile Doctor Seal & Go which as you can see from the photograph below has really brought the slate back to life.

Slate Tiles in Burton on Trent After Cleaning Slate Tiles in Burton on Trent After Cleaning

The customer was delighted with the transformation of the floor.

Slate tiled Kitchen floor Cleaned and Sealed in Staffordshire

Slate tiled kitchen floor refreshed in Burton on Trent Read More »

Victorian Tiled Floor After Cleaning in Stoke-on-Trent

Renovating a Victorian Tiled Hallway floor in Stoke on Trent

I’ve seen a few Victorian Tiled floors in my time and I can tell you the condition of this particular floor was one of the worst I’ve seen in a while. The tiles had been covered up with carpet tiles which had been stuck down with a strong adhesive and there was still a fair amount of carpet tile backing that needed removing, grout was also missing in places and I could see a fair amount of work would need to be done to get this floor restored.

Victorian Tiled Floor Before Cleaning in Stoke-on-Trent Victorian Tiled Floor Before Cleaning in Stoke-on-Trent

Cleaning Victorian Floor Tiles

The first job was to clean what I could of the floor and remove the remaining carpet tile so working in sections I applied Tile Doctor Pro-Clean and scrubbed it into the tiles carefully scraping off the tile backing as I went. There were a lot of tiles to cover so as you can imagine this was quite a painstaking process and I was literally working on one time at a time to get the job done. Once complete the floor was given a thorough rinse to remove any cleaning products and soiled cleaning solution which was then removed using a wet vacuum.

Once the floor was clean it was evident that some tiles were loose and needed resetting and others would need grouting so I set about doing this making sure to use a matching grout.

Sealing Victorian floor Tiles

I left the floor to dry overnight and came back the next day to seal the tiles. Fortunately they had dried overnight so I applied four coats of Tile Doctor Seal & Go. This is an ideal sealer for Victorian tiles as it adds a classic shine to the floor and will provide good protection from stains going forward. I think you will agree the floor has been transformed and now loos amazing, certainly the customer was very happy.

Victorian Tiled Floor After Cleaning in Stoke-on-Trent Victorian Tiled Floor After Cleaning in Stoke-on-Trent


Victorian hallway floor tiles restored in Staffordshire

Renovating a Victorian Tiled Hallway floor in Stoke on Trent Read More »

Grout Colour Before Tamworth

Grout Colouring Ceramic Floor Tiles in Tamwoth

This was a straight forward Grout Colouring job at a house in the market town of Tamworth, Staffordshire. The tiles had been installed with a white grout and over the years the grout had become darker as the dirt had become ingrained into the porous top layer. This is often the case with Porcelain and Ceramic tiles whose looks always outlive that of the grout.

Grout Colour Before Tamworth Grout Colour Before Tamworth

Cleaning and Colouring Grout

The customer was keen to get the grouting looking the same as it was when first installed and so with that aim in mind a dilution of Tile Doctor Pro-Clean was applied and scrubbed into the grout lines and then washed off with water. Pro-Clean is a strong alkaline cleaning product that does a good job cleaning up grout however it can only do so much and in this case although it made a difference there were many areas which were too stained.

The next step was to apply a grout colouring product, they come in a number of different colours and the best match to the original colour was Ivory. The Pro-Clean had already prepared the surface so no need to use a pre-treater, it was just a question of waiting for the grout to dry and then apply the colourant.

Applying grout colourant is fiddly work but you do get the pleasure of watching the floor become slowly transformed, also the colourant works as a sealant which will prevent staining and make the grout very easy to clean going forward.

Grout Colour After Tamworth Grout Colour After Tamworth

As you can see the floor looks like new and the customer was very happy.

Grout Colouring Floor Grout in Staffordshire

Grout Colouring Ceramic Floor Tiles in Tamwoth Read More »

Victorian Tiles Sutton Coldfield After Restoration

Victorian Tiled Hallway Restoration in Sutton Coldfield

This job was a full restoration of a Victorian tiled floor that had been hidden under those thin adhesive backed lino tiles (see photo below) in the hallway of a house in Sutton Coldfield.

Victorian Tiles Sutton Coldfield Before Restoration

Restoring Victorian Floor Tiles

The first job was to remove the vinyl tiles which being stuck onto the floor left a rather nasty looking floor. I knew from experience this would be tricky to remove and so soaked the floor in Tile Doctor Remove and Go (does what it says on the tin) and left it for a while to soften the glues. Then with a rotary machines fitted with a polyscrub brush attached running at slow speed set about scrubbing the floor to get as much glue of the Victorian floor tiles as possible. This process worked quite well however once I have removed the soiled solution using a wet vacuum I could see there were still quite a a few stubborn patches remaining. The solution was to get down on my hands & knees with a nylon brush, a scraper and more Remove and Go, as you can imagine it took a long time to get the floor really clean and when finished I gave the tile a thorough wash down with water to neutralise the floor and then left it overnight to dry.

Victorian Tiles Sutton Coldfield Before Restoration Victorian Tiles Sutton Coldfield Before Restoration

Sealing Victorian floor Tiles

The next day I confirmed the floor had dried and then proceeded to apply four coats of Tile Doctor Seal & Go which is the recommended sealer for Victorian tiles, it not only protects the tile it also leaves a nice shine on the floor.

The photographs show a huge transformation and my customer was absolutely delighted with the results, and left the comment below on the Tile Doctor feedback system.

Trevor had a very tough job to do getting our Victorian tiles into shape after decades under a Marley tile floor. They were covered in layers of hard glue but Trevor worked exceptionally hard restoring them to like new. Trevor was very friendly and punctual. An excellent job done and we would definitely recommend him.
Mr. G. Stendall, Sutton Coldfield, West Midlands

Victorian Tiles Sutton Coldfield After Restoration Victorian Tiles Sutton Coldfield After Restoration


Victorian tiled hallway floor Restored in Sutton Coldfield

Victorian Tiled Hallway Restoration in Sutton Coldfield Read More »

Victorian Tiled Floor After Cleaning

Victorian Tiled Hallway floor cleaning in Weeping Cross

This classic Victorian tiled floor was installed in the hallway of a house in the town of Weeping Cross, Staffordshire. The floor was in pretty good condition but had become dull and was in need of a deep clean to put some life back in the tiles, there was also evidence an old adhesive around the edges indicating it had been covered by carpet at some point.

Victorian Tiled Floor Before Cleaning Victorian Tiled Floor Before Cleaning

Cleaning Victorian Floor Tiles

The first job was to remove the glue which I did with a small black scrubbing pad and a mixture of Tile Doctor Remove & Go combined with NanoTech UltraClean and a scraper.

The Remove and Go NanoTech worked well on the stubborn adhesive so I went onto clean the rest of the floor using the same product combination but this time worked in using a rotary machine fitted on slow speed with a black scrubbing pad pad. The resulting soiled solution was vacuumed up using a wet pick up machine and the floor left to dry overnight.

Sealing Victorian floor Tiles

The next morning I mopped the floor with a damp mop and then when it was dry applied four coats of Tile Doctor Seal & Go which is a recommended protective sealer for Victorian tiles and leaves a nice shine on the floor. As you can see it looks fantastic and when the owners came home they were thrilled with the results and left the comment below on the Tile Doctor feedback system.

Trevor has done a great job with our tiled floor, we are so pleased with the results! We would definitely recommend him!
Mark Broomhall, Stafford

Victorian Tiled Floor After Cleaning Victorian Tiled Floor After Cleaning


Victorian hallway floor tiles cleaned in Staffordshire

Victorian Tiled Hallway floor cleaning in Weeping Cross Read More »

Quarry Tiles After Cleaning

Victorian Quarry Tiled floor Restored in Leek

These old red and black Victorian quarry tiles at a house in Leek, Staffordshire, were in a bit of a state as you can see from the photographs below.

Quarry Tiles Before Cleaning Quarry Tiles Before Cleaning

Cleaning old Quarry Tiles

To clean the floor I applied a 50/50 mix of Tile Doctor Pro-Clean and NanoTech Ultra Clean diluted with water which was left to soak into the floor and then worked into the tile using a rotary machine fitted with a black scrubbing pad running at a slow speed. Pro-Clean is a strong alkaline cleaner and NanoTech Ultra Clean adds tiny abrasive particles to the solution that can help lift out the dirt.

After cleaning it I noticed that in places it was not as clean as I would of liked it, so to improve it further it necessary to get on my hands and knees and scrub them with a stronger dilution of the Pro-Clean and NanoTech UltraClean solution and a small black pad. This did the trick and so final step was to neutralise the floor tiles ready for sealing by giving them a good wash with clean water and then left it overnight to dry. A Wet Vacuum comes in handy during this process for removing fluids from the floor

Sealing old Victorian Quarry Tiles

The next day I wiped it over with a damp mop to get any dirt or dust that might have settled overnight and then when it was dry again I applied four coats of Tile Doctor Seal & Go using an air mover to help dry the floor quicker between coats.

Quarry Tiles After Cleaning Quarry Tiles After Cleaning

Seal and Go adds a nice low shine to the tile and as you can see the floor looked amazing afterwards, needless to say the customer was very pleased with the transformation and left the comment below.

“I found Trevor a very professional and dedicated workman. He would not let the job finish until he had got the best result.
Miss Jackie Spencer, Leek”

Quarry Tiles After Cleaning Quarry Tiles After Cleaning


Victorian Quarry Tiles transformed in Leak, Staffordshire

Victorian Quarry Tiled floor Restored in Leek Read More »

Grout Colouring Bathroom Before and After

Changing the Grout Colour of a Tiled Shower Cubicle in Birmingham

This Ceramic tiled shower cubicle was installed at house in Birmingham, although the Ceramic tiles were in reasonable condition the customer wanted the grout to be refreshed. Ten years ago it would have been necessary to scrape out the top layer of grout and replace however the modern grout colourant kits allow you to achieve the same effects for a lot less expense.

Grout Colouring Bathroom Before Grout Colouring Bathroom Before

Cleaning Tile and Grout

The first job was to clean the grouting with a dilution of Tile Doctor Pro-Clean worked in by hand using a scrubbing brush, we also removed the towel radiator on one wall to make sure we could get to the grout behind. Pro-Clean is a very effective tile and grout cleaner that’s good at getting grease & grime out of the grouting, this process also provides a good foundation for the grout colourant which needs a clean surface. If you’re cleaning the grout yourself you may want to consider using Tile Doctor Oxy-Pro instead as it’s a similar product that is ready to use.

Once the grout was dry Grout Colourant in a Linen colour was applied into the grout lines and the excess wiped off, I then cleaned off all the excess Grout Colourant from the tile surface and gave the tiles a good clean. As you can see it made a big difference to the bathroom and I think you will agree the choice of Linen colourant worked well and blended in well with the colour of the tiles needless to say the customer was delighted.

Grout Colouring Bathroom After Grout Colouring Bathroom After

I should mention that the Grout Colourant range supplied by Tile Doctor also seals the grout preventing it from staining and therefore ensuring it will look good for some time to come.

Grout Colouring a Ceramic Tiled bathroom in Birmingham< /h3>

Changing the Grout Colour of a Tiled Shower Cubicle in Birmingham Read More »

Limestone floor Before and After

Limestone tiles cleaned and polished in Burton on Trent

This Limestone tiled floor was installed in a Kitchen at a house near Burton on Trent. You can see from the photographs below that the Limestone had lost its polished appearance and was trapping dirt on the surface including a few stubborn marks; the grout was also looking grubby and dark.

Limestone Floor Before Limestone Floor Before

Cleaning a Limestone Tiled Floor

Restoring the shine on a polished stone such as Limestone, Travertine or Marble requires the surface to be stripped back and then buffed, which we did by using a set of burnishing pads. These diamond encrusted pads come in different grade sand each one does a different job from scrubbing to polishing. I started with the course red pad together with a little water and then carried on with the white, then yellow pads again using a little water removing the soiled water along the way. Finally when I had dried the floor I used a green pad to buff the floor up. This activity took most of the day so left the floor to dry off overnight.

Sealing Limestone Tile

On our return the next day the floor was given a quick wipe with a damp mop to get remove any debris or dust that may have landed on the floor overnight. This soon dried and we were able to apply two coats of Tile Doctor Colour Grow which is a specially designed stone sealer that brings out the deep colour of the stone. Once this had dried it was given a quick once over with a white buffing pad fitted to a rotary machine on a slow speed, this step ensures any excess sealant is removed off the tiles.

The floor was then left for about one hour to dry before working in Tile Doctor Shine powder with a buffing pad to give a really deep finish. We were still not finished however; the grout was still looking grubby so we agreed with the customer to pop back the next day and apply Tile Doctor Grout Colourant in a Sandstone colour.

Limestone Floor After Limestone Floor After

When we had finished the customer was very happy with the work we done and even commented that it looked better than when they first had the floor laid. I recommended that for future maintenance and to extend the life of the sealer they should use Tile Doctor neutral cleaner, it’s a PH neutral cleaner and so is safe to use on sealed stone.

Limestone Tile Maintenance in Burton on Kent

Limestone tiles cleaned and polished in Burton on Trent Read More »

Slate Floor After Cleaning

Slate tile maintained in Bridgenorth

This slate tiled floor was installed in the Kitchen of a house in the town of Bridgnorth which is in the Severn Valley Staffordshire. The owner of the house wanted to have the floor deep cleaned and re-sealed and so gave us a call.

Cleaning black slate floor tiles

We set about cleaning the kitchen floor with a mixture of Tile Doctor Pro-Clean mixed 50/50 with Tile Doctor Nano-tech Ultraclean which was worked into the pores of the slate tile using a slow speed rotary machine fitted with a Polyscrub scrubbing pad which can reach down into grouting as well as scrubbing the floor. I then used a wet vacuum to remove the resultant soiled solution before rinsing the floor down twice with cold water, this also neutralises the floor prior to sealing.

Slate Floor Before Cleaning Slate Floor Before Cleaning

Sealing Slate floor tiles

I left the floor overnight to dry then came back next day and used a damp test meter to verify the floor was dry and ready for sealing. Once happy I proceed to apply three coats of Tile Doctor Seal & Go which as you can see from the photograph below has really brought out the natural colours in the slate. I used a water test after the third coat was dry to see if the water would form bubble on the surface thus indicating it was dry, which it did thereby indicating the floor was fully sealed.

Slate Floor After Cleaning Slate Floor After Cleaning

Overall the job took two days and I’m happy report the customer was delighted with the outcome.

Slate tiled Kitchen floor Cleaned and Sealed in Staffordshire

Slate tile maintained in Bridgenorth Read More »

Slate Floor After Cleaning

Slate tiled floor cleaned and sealed in Burton on Trent

This slate tiled floor was installed in a Kitchen in Burton on Trent, Staffordshire. The owner of the house felt it was time to get it cleaned and re-sealed so gave us a call.

Cleaning black slate floor tiles

We set about cleaning the kitchen floor with a mixture of Tile Doctor Pro-Clean mixed 50/50 with Tile Doctor Nano-tech Ultraclean which was worked into the pores of the slate tile using a slow speed rotary machine fitted with a Polyscrub scrubbing brush which can reach down into grouting as well as scrubbing the floor. I then used a wet vacuum to remove the resultant soiled solution before rinsing the floor down twice with cold water, this also neutralises the floor prior to sealing.

Slate Floor Before Cleaning

Sealing Slate floor tiles

I left the floor overnight to dry then came back next day and used a damp test meter to verify the floor was dry and ready for sealing. Once happy I proceed to apply three coats of Tile Doctor Seal & Go which as you can see from the photograph below has really brought out the natural colours in the slate. I used a water test after the third coat was dry to see if the water would form bubble on the surface thus indicating it was dry, which it did thereby indicating the floor was fully sealed.

Slate Floor After Cleaning
Overall the job took two days and I’m happy report the customer was amazed with the outcome and very pleased.

Slate tiled Kitchen floor maintained in Staffordshire

Slate tiled floor cleaned and sealed in Burton on Trent Read More »

=================================

Staffordshire Tile Doctor

================================= Read More »

Scroll to Top